Breathing
Exhale through the turning or resisting effort and inhale as you return. Move only through a range that allows calm, continuous breathing.
Getting your next view ready…
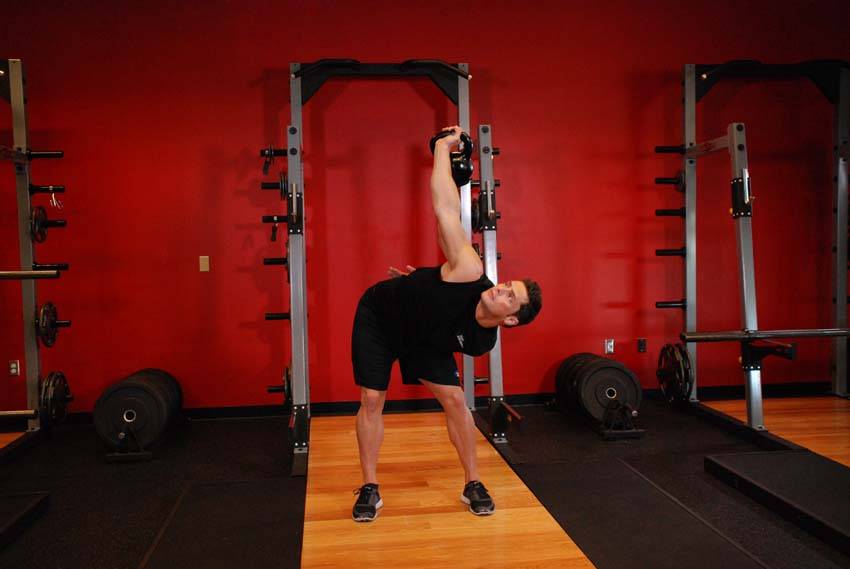
The Advanced Kettlebell Windmill primarily works the abdominals, with the glutes, hamstrings and shoulders supporting the movement. It is a strength movement performed with kettlebells.
 1 / 2
1 / 2How to
Movement instructions
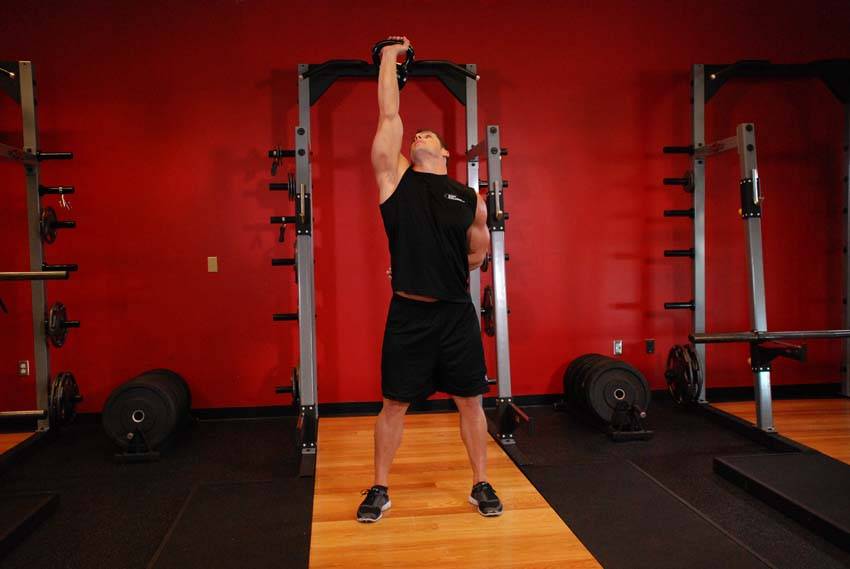
Clean and press a kettlebell overhead with one arm.
Keeping the kettlebell locked out at all times, push your butt out in the direction of the locked out kettlebell. Keep the non-working arm behind your back and turn your feet out at a forty-five degree angle from the arm with the kettlebell.
Lower yourself as far as possible.
Pause for a second and reverse the motion back to the starting position.
Technique guidance
Exhale through the turning or resisting effort and inhale as you return. Move only through a range that allows calm, continuous breathing.
General guidance based on the exercise and equipment. It is not personal coaching or medical advice.
Your progress
Keep the same kettlebells setup, range of motion and recording method when comparing Advanced Kettlebell Windmill sessions.
Weight, repetitions and completed sets.
Example: 3 sets of 8 reps at 30 kg. Next time, record the actual result, even if it is the same.
Look for more repetitions at the same weight, or a heavier weight for comparable repetitions. Total weight lifted also changes when you add sets, so it is not a strength score.
Read the tracking guideThe examples show how to keep a record. They are not workout targets or a personalised training plan.
See how Jijibisha tracks your progressMuscles
Muscle guide
Abdominals is the primary muscle group. The lighter highlights show the supporting muscles involved in the movement.
In depth
The advanced kettlebell windmill is a demanding strength and mobility exercise that challenges your core, shoulders, hips, and hamstrings in a single controlled movement. You hold a kettlebell overhead while hinging through the hips and lowering your torso toward the opposite leg.
Although it may look like a standing side bend, the windmill is primarily a hip hinge performed beneath a stable overhead weight. The kettlebell should remain stacked above the shoulder while your hips move sideways and backward. Your torso changes position underneath the weight rather than allowing the weight to travel around your body.
This combination makes the advanced kettlebell windmill valuable for developing core control, shoulder stability, hip mobility, coordination, and confidence under an overhead load. It can also reveal differences in mobility or control between your left and right sides.
However, this is not an exercise to rush into. You should already be comfortable with hip hinging, overhead kettlebell holds, core bracing, and controlled rotation before performing the fully loaded version.
The advanced kettlebell windmill, sometimes called the high windmill or overhead kettlebell windmill, is performed with one kettlebell locked out above your head.
From a wide stance, you turn your feet slightly away from the loaded arm, shift your hips toward the loaded side, and lower your free hand toward the opposite leg. Throughout the movement, your overhead arm remains straight and the kettlebell stays vertically aligned over your shoulder.
For example, when holding the kettlebell in your right hand:
The movement combines several physical qualities at once. Your hips must hinge, your upper back must rotate, your core must control the position of your trunk, and your shoulder must stabilize the kettlebell overhead.
That is why the windmill is better understood as a full-body stability exercise than a simple abdominal isolation movement.
| Category | Details |
|---|---|
| Primary focus | Core stability and oblique strength |
| Secondary muscles | Shoulders, glutes, hamstrings, upper back and grip |
| Equipment | One kettlebell |
| Difficulty | Advanced |
| Movement pattern | Hip hinge with controlled rotation |
| Best rep range | 3 to 8 repetitions per side |
| Typical loading | Light to moderate |
| Best used for | Core control, shoulder stability and mobility |
| Common variation | Low kettlebell windmill |
| Main requirement | Stable overhead lockout |
The kettlebell windmill works several muscle groups simultaneously. Some muscles create movement, while others work isometrically to prevent unwanted movement.
The internal and external obliques are heavily involved in controlling the position of your torso. They help manage rotation and prevent your trunk from collapsing sideways under the weight.
Your obliques remain active during both the lowering and rising portions of the exercise. They do not simply twist your torso. They help you maintain a stable relationship between your rib cage and pelvis while your hips and upper back move.
The deeper abdominal muscles help create tension around the midsection. This tension supports your spine and keeps the movement controlled.
Instead of repeatedly flexing the spine as you would during a crunch, the windmill teaches your abdominal muscles to stabilize your torso while your body moves through multiple planes.
The rectus abdominis, commonly called the six-pack muscle, assists with trunk stability. It helps prevent excessive arching through the lower back, particularly when the kettlebell is held overhead.
Although the rectus abdominis is active, the windmill should not feel like a conventional abdominal crunch. The goal is to maintain control rather than force the spine into repeated flexion.
The deltoids, rotator cuff muscles, and muscles surrounding the shoulder blade work to keep the kettlebell stable overhead.
Your shoulder must remain centered and controlled while the rest of your body changes position. The kettlebell should stay stacked over the shoulder rather than drifting forward, backward, or sideways.
The smaller stabilizing muscles may work hard even when the kettlebell feels relatively light.
The latissimus dorsi, or lats, help support the overhead arm and connect the shoulder to the trunk. Engaging the lat can make the shoulder feel more stable and prevent the loaded shoulder from shrugging toward your ear.
Think about keeping space between your shoulder and ear while maintaining a long, straight overhead arm.
The glutes control the hip hinge and help return your body to the standing position.
As you descend, the glute on the loaded side helps control your hips. As you rise, the glutes extend the hips and bring your torso back to an upright position.
The hamstrings are loaded as you push your hips backward and sideways. Many people feel a noticeable stretch through the hamstring on the loaded side.
The amount of hamstring tension depends on your stance, knee position, mobility, and depth. You should feel controlled tension rather than sharp pulling.
The muscles of the upper back help maintain chest position and support the shoulder blade. Adequate movement through the upper back allows your chest to rotate without forcing excessive movement through the lower back.
Your hand and forearm must continuously control the kettlebell handle. Grip strength becomes increasingly important as the weight increases or the set becomes longer.
The kettlebell should rest comfortably against the back of your forearm without pulling your wrist into an unstable position.
Many abdominal exercises involve bending the spine forward. The advanced kettlebell windmill trains your core differently.
Your abdominal muscles must maintain control while your hips hinge, your upper back rotates, and an uneven load remains overhead. This teaches your core to resist unwanted movement while still allowing controlled movement where it is needed.
That type of trunk control can support exercises such as overhead presses, carries, Turkish get-ups, squats, deadlifts, and single-arm rows.
Holding a kettlebell overhead is already a shoulder stability challenge. Performing a windmill increases that challenge because your torso moves beneath the weight.
The shoulder stabilizers must continuously adjust to keep the kettlebell aligned. This can help build control and confidence in overhead positions when the movement is performed with an appropriate weight.
A good windmill requires you to separate movement at the hips from movement at the lower back.
You must push the hips sideways and backward while keeping the spine controlled. This reinforces the hip hinge pattern used in deadlifts, kettlebell swings, Romanian deadlifts, bent-over rows, and many athletic movements.
The advanced kettlebell windmill is sometimes described as a loaded mobility exercise because it combines active range of motion with muscular tension.
The movement can challenge mobility through the hamstrings, hips, upper back, and shoulders. At the same time, you must remain strong enough to control the available range.
The goal is not to force yourself into a deeper position. The goal is to become stronger within the range you can control.
Many common gym exercises occur primarily in a forward and backward direction. Examples include squats, bench presses, curls, deadlifts, and lunges.
The windmill introduces lateral movement and controlled rotation. This can make your training more complete by requiring you to manage force across different directions.
You may notice that one side feels stable while the other feels restricted or uncoordinated.
These differences can come from hip mobility, hamstring flexibility, upper-back rotation, shoulder stability, grip strength, or familiarity with the movement.
Use the weaker side as useful information. Do not force it to match the stronger side immediately. Reduce the load or range and build control gradually.
The kettlebell windmill requires constant attention to the position of your feet, hips, torso, shoulder, arm, wrist, and kettlebell.
This makes it a useful exercise for developing coordination and body awareness. A successful repetition depends more on precise positioning than speed or momentum.
Stand with your feet slightly wider than shoulder-width apart.
Your exact stance will depend on your leg length, hip structure, and mobility. A stance that is too narrow may make it difficult to shift your hips. A stance that is excessively wide may make you feel unstable.
Start with a moderately wide position and adjust as needed.
Clean and press the kettlebell overhead using one arm.
Straighten the elbow and position the wrist above the elbow and shoulder. The kettlebell should rest against the back of your forearm.
Before continuing, confirm that you can hold the kettlebell overhead without wobbling, bending your elbow, arching your lower back, or shrugging aggressively.
Turn both feet slightly away from the arm holding the kettlebell.
When the kettlebell is in your right hand, your feet should turn slightly toward the left. An angle of approximately 30 to 45 degrees works for many people, but the exact position can vary.
Keep your knees aligned with your toes. Do not allow either knee to collapse inward.
Keep the overhead arm straight and actively control the kettlebell.
Brace your midsection without holding your breath excessively. Keep your ribs from flaring upward and avoid leaning backward.
Look up toward the kettlebell before beginning the descent. Continue watching it as long as doing so feels comfortable for your neck.
Push your hips toward the side of the loaded arm.
With the kettlebell in your right hand, your hips should move toward the right while your torso begins lowering toward the left.
Think about closing the crease of the loaded-side hip rather than bending directly sideways at the waist.
Allow your free hand to travel down the inside of the opposite thigh.
Do not reach aggressively for the floor. Your hand may stop at your thigh, knee, shin, ankle, or the floor depending on your mobility and proportions.
The depth of the movement is less important than maintaining a stable shoulder, controlled spine, and proper hip hinge.
As your torso lowers, continue pressing the kettlebell toward the ceiling.
The weight should remain vertically stacked over the shoulder. Your torso moves underneath the kettlebell, but the kettlebell itself should not swing around.
Keep the elbow locked and the wrist controlled.
Stop when you reach the deepest position you can control without losing alignment.
You should feel tension through the hips, hamstrings, core, and shoulder. You should not feel sharp pain, pinching, numbness, or uncontrolled pressure in the lower back.
Pause briefly while maintaining steady tension.
Press your feet into the floor and drive your hips back toward the center.
Use your glutes and core to bring your torso upright. Keep the kettlebell overhead throughout the return.
Finish standing tall with your ribs stacked over your pelvis. Reset your balance and breathing before beginning the next repetition.
After completing the set, bring the kettlebell back to the rack position before lowering it.
Do not casually drop the arm from the overhead position when your shoulder and grip are fatigued.
Use this checklist before increasing the weight:
If several of these points break down, reduce the kettlebell weight, shorten the range of motion, or use an easier windmill variation.
Different cues work for different people. Try these during practice:
Avoid trying to use every cue at once. Choose one or two that address the part of the movement you are currently learning.
A windmill is not performed by simply bending sideways through the waist.
You should initiate the movement by shifting the hips toward the loaded side and hinging backward. Some torso rotation occurs, but it should remain controlled.
When the hips do not move properly, the lower back may be forced to create more of the range.
Touching the floor is not required.
Trying to reach lower than your mobility allows often causes the spine to round, the shoulder to lose alignment, or the knees to twist.
Let your free hand stop wherever your form remains strong. Depth should improve as a result of better mobility and control, not by forcing the movement.
The windmill is a poor exercise for proving how heavy you can lift.
A kettlebell that is too heavy may pull your shoulder out of position, shorten your range of motion, or make you rush the repetition.
Choose a weight that allows you to pause during the descent and maintain a stable overhead arm.
When the kettlebell moves in front of the shoulder, the arm may no longer be supported by a strong vertical stack.
Continue pressing upward while keeping the wrist, elbow, and shoulder aligned. Your torso should move beneath the weight rather than pulling the weight forward with you.
A bent elbow usually indicates that the kettlebell is too heavy, the shoulder is losing stability, or the lifter is no longer actively controlling the arm.
Use a lighter kettlebell and practise overhead holds before returning to the full windmill.
The loaded shoulder should remain active, but it should not be jammed toward your ear.
Maintain a long neck and engage the muscles around your shoulder blade. Think about reaching the kettlebell upward without allowing your entire shoulder to rise uncontrollably.
Your feet and knees should follow the same general direction.
Do not force rotation through a planted knee to create more range. Adjust your foot angle before beginning the repetition and keep your knees tracking over your toes.
A small amount of natural spinal movement may occur, but the windmill should not become a rounded forward fold.
Push your hips back, maintain abdominal tension, and stop the descent before your lower back loses control.
Fast repetitions make it difficult to feel whether the kettlebell is stacked properly.
Use a deliberate tempo. Taking two to four seconds to lower the body can improve awareness and expose weak positions before they become dangerous.
Bracing is important, but your breathing should remain controlled.
Take a breath before beginning the descent, maintain abdominal pressure as needed, and exhale gradually as you return to standing. Reset between repetitions when necessary.
The set should end when you can no longer keep the kettlebell stable.
Do not wait until your arm is shaking severely or your elbow begins bending. Technical failure should determine the end of the set, not complete muscular exhaustion.
You should descend only as far as you can while maintaining all of the following:
Some lifters can reach the floor while maintaining excellent form. Others may stop near the knee or shin. Both can perform an effective kettlebell windmill.
Your range may improve over time as you develop hamstring mobility, hip control, upper-back rotation, and confidence in the movement.
Do not measure progress only by how close your hand gets to the floor. Better shoulder alignment, slower repetitions, improved balance, and smoother control are equally valuable signs of progress.
Use a kettlebell that feels lighter than the weight you would normally overhead press for repetitions.
The windmill places the shoulder in a demanding position while the body moves beneath the load. A kettlebell that feels manageable during a standing press may become difficult to stabilize during the descent.
Your starting weight should allow you to:
There is no universal starting weight. Training experience, shoulder strength, body size, mobility, and kettlebell technique all affect what is appropriate.
Begin conservatively. Increase the load only after both sides feel stable through your intended range.
The advanced kettlebell windmill is usually more effective with low to moderate repetitions. Technique often deteriorates when people perform long sets under fatigue.
| Training goal | Sets | Repetitions | Rest |
|---|---|---|---|
| Learning technique | 2 to 3 | 3 to 5 per side | 60 to 90 seconds |
| Mobility and control | 2 to 4 | 4 to 6 per side | 60 to 90 seconds |
| Core stability | 3 to 4 | 5 to 8 per side | 60 to 120 seconds |
| Strength | 3 to 5 | 3 to 5 per side | 90 to 180 seconds |
| Warm-up practice | 1 to 2 | 3 to 4 per side | As needed |
Stop each set before your grip, shoulder, or core becomes too fatigued to maintain alignment.
A controlled tempo works particularly well for windmills.
Try the following:
The slow descent teaches you to maintain control while the leverage changes. The pause confirms that you own the bottom position rather than relying on momentum.
Learn to push your hips backward without rounding your lower back.
Kettlebell deadlifts, Romanian deadlifts, and bodyweight hip hinges can help establish this movement pattern.
Perform the windmill without any weight.
Reach one arm overhead and practise shifting your hips while lowering the opposite hand. This allows you to learn foot position and torso movement without worrying about the kettlebell.
Press a light kettlebell overhead and hold it for 15 to 30 seconds.
Maintain a straight elbow, stable wrist, stacked rib cage, and controlled shoulder. Practise on both sides.
Hold the kettlebell in your lower hand while keeping the opposite arm extended overhead.
This variation allows you to practise the hip hinge and rotation without stabilizing a weight above your head.
Hold a light kettlebell overhead and lower only until your free hand reaches your thigh or knee.
Gradually increase the range as your control improves.
Once the partial-range version feels stable, descend farther while maintaining the same alignment.
Do not add depth and weight at the same time.
Pause during the middle or bottom of each repetition.
Pauses increase time under tension and show whether you can maintain control without momentum.
Add weight in small increments only after you can complete every repetition with a stable shoulder and consistent range.
Range, control, and alignment should improve before load.
This is the simplest version for learning the movement pattern. It is also useful as a warm-up before loaded windmills.
The kettlebell remains in the lower hand while the opposite arm reaches overhead.
This reduces the overhead stability requirement while still training the hip hinge, hamstrings, glutes, and torso position.
The kettlebell is held overhead throughout the movement. This is the variation most people mean when referring to the advanced kettlebell windmill.
Pause for one to three seconds at the bottom or halfway through the descent.
This variation builds positional strength and discourages rushing.
Hold one kettlebell overhead and another kettlebell in the lower hand.
This significantly increases the total load and requires excellent balance, mobility, grip strength, and shoulder control. It should be reserved for experienced kettlebell lifters.
Hold the kettlebell upside down with the bell above the handle.
The unstable position creates a major grip and shoulder stability challenge. Use a very light kettlebell and attempt this variation only after mastering the standard overhead windmill.
A dumbbell can replace the kettlebell when no kettlebell is available.
The movement pattern remains similar, although the load sits differently above the wrist. Some people find a dumbbell easier to balance, while others prefer how a kettlebell rests against the forearm.
The Turkish get-up develops full-body coordination, shoulder stability, core control, and the ability to move beneath an overhead kettlebell.
It includes several positions and transitions, while the windmill focuses more specifically on the standing hip hinge and rotational position.
An overhead hold is a useful alternative when your shoulder is not yet stable enough for a full windmill.
You can also practise walking slowly while holding the kettlebell overhead once a stationary hold feels comfortable.
The suitcase carry trains your core to resist sideways bending while holding a kettlebell on one side.
It provides a simpler way to develop lateral core stability without placing a weight overhead.
The side plank strengthens the obliques and other lateral core muscles without requiring kettlebell technique.
It can be used as preparation for the windmill or as an alternative when overhead loading is unsuitable.
Romanian deadlifts develop the hip hinge, glutes, and hamstrings.
They do not include the same rotational or overhead stability challenge, but they can help build the lower-body pattern needed for a controlled windmill.
The half-kneeling press develops overhead control while reducing the number of moving parts.
It can help you learn to keep your ribs controlled and shoulder stable before progressing to standing rotational exercises.
A useful warm-up should prepare your hips, hamstrings, upper back, shoulders, and core.
Try the following sequence:
You can use the 90/90 hamstring exercise as part of your preparation when hamstring mobility limits your hinge.
The warm-up should make the movement feel smoother. It should not tire your shoulders or grip before the working sets begin.
The ideal placement depends on why you are performing the exercise.
Place windmills near the beginning when your main goal is improving technique, mobility, or shoulder control.
Perform them after your general warm-up but before heavy presses, carries, squats, or deadlifts.
Windmills work well after your main strength exercises.
For example:
Keep the weight moderate if your shoulders are already fatigued from pressing.
Use a light kettlebell and focus on slow, comfortable repetitions.
Treat the movement as loaded mobility rather than a strength test.
The windmill can be paired with movements such as kettlebell swings, goblet squats, presses, rows, and carries.
Avoid placing it immediately after an exercise that severely fatigues your grip or overhead stability.
Rest long enough to maintain control during every windmill repetition.
The exercise may be useful for:
The word “advanced” refers to the coordination, mobility, and stability required. It does not mean you need to use a heavy kettlebell.
A skilled lifter may perform windmills with a light weight because technique is the main priority.
Consider using an easier variation if you cannot maintain a stable overhead arm, control your hip hinge, or keep your knees aligned.
You should also be cautious if you currently have:
Do not use the windmill to push through pain. A shorter range, bodyweight version, low windmill, or different core exercise may be more appropriate.
Seek guidance from a qualified healthcare or fitness professional when pain, injury, or a medical condition affects your ability to train safely.
The advanced kettlebell windmill primarily trains the obliques and other core muscles. It also challenges the shoulder stabilizers, glutes, hamstrings, lats, upper back, forearms, and grip.
Different muscles contribute depending on your stance, range of motion, kettlebell weight, and technique.
Yes, but it does not train the abdominals like a crunch.
Your core works mainly to stabilize your trunk, control rotation, and resist unwanted sideways bending while the kettlebell remains overhead.
It can be both.
With a light kettlebell and a controlled range, it can function as a loaded mobility exercise. With a heavier but manageable kettlebell, it becomes a demanding strength and stability movement.
Most people benefit from prioritizing control and mobility rather than trying to lift the heaviest possible weight.
The fully loaded overhead version is generally not a beginner exercise.
Beginners can start with bodyweight windmills, hip hinge practice, overhead holds, and low windmills. These regressions teach the necessary positions before adding an overhead load.
No. Touching the floor is optional.
Your hand should travel only as low as your mobility and control allow. A repetition that stops at the knee with excellent alignment is better than a deeper repetition performed with a rounded back or unstable shoulder.
The loaded-side leg is usually kept mostly straight, although a small amount of softness at the knee may be comfortable.
Your exact knee position can vary based on mobility and body structure. Avoid locking the knee aggressively or allowing it to collapse inward.
Many lifters look at the kettlebell throughout the movement because this helps them monitor its position.
However, your neck should remain comfortable. If looking upward causes discomfort or dizziness, use a lighter variation and adjust your gaze.
The hip hinge lengthens and loads the hamstrings, particularly on the loaded side.
Some hamstring tension is normal. Sharp pain, cramping, or an aggressive pulling sensation indicates that you should reduce the range or stop the exercise.
You may be bending through the spine instead of hinging through the hips. Other possible causes include using too much weight, reaching too far, losing abdominal tension, or forcing rotation.
Reduce the depth and practise the movement without weight. Stop if the discomfort continues or becomes painful.
Yes. A dumbbell can be used when a kettlebell is unavailable.
The balance and wrist position will feel different, but the main movement pattern remains the same.
One to three sessions per week is enough for most people.
The appropriate frequency depends on your program, recovery, shoulder health, and training goals. Start with one or two weekly sessions and monitor how your body responds.
Yes. Train both sides unless a qualified professional has given you a specific reason not to.
Begin with the less coordinated side and use the same weight and repetition target for the stronger side. Do not force both sides to use the same depth if their mobility differs.
Windmills can strengthen the abdominal muscles, particularly the obliques, but no individual exercise determines whether your abs are visible.
Visible abdominal definition also depends on overall muscle development, nutrition, body-fat levels, genetics, sleep, and training consistency.
The movement challenges shoulder stability and control in an overhead position. It also requires enough shoulder and upper-back mobility to keep the kettlebell stacked safely.
It should not be used to force a painful or restricted shoulder into a deeper range. Build the position gradually with light overhead holds and appropriate mobility work.
The windmill focuses on a standing hip hinge performed beneath an overhead kettlebell.
The Turkish get-up involves moving from the floor to standing through several positions. Both train shoulder stability, core control, and coordination, but the Turkish get-up is a longer and more complex sequence.
The advanced kettlebell windmill is not about reaching the floor or lifting the heaviest kettlebell available. It is about controlling your body beneath a stable overhead weight.
A good repetition combines a strong hip hinge, active core, stable shoulder, secure grip, and smooth return to standing. Every part of the movement should remain deliberate.
Start with a light kettlebell, use only the range you can control, and progress gradually. Better alignment, slower repetitions, and improved stability matter more than adding weight quickly.
Record your sets, repetitions, kettlebell weight, and range of motion so you can monitor your progress over time. You can use Jijibisha routines to organize the movement within your training plan and keep a consistent record of your workouts.
Swap it
Different equipment, same muscle
These movements also target the abdominals using something else.
Related
Related movements
Get the app
Add it to a routine, record every completed set, and keep the workout saved on your phone even when the gym has no reception.