Breathing
Exhale as you pull through the working range and inhale during the controlled return. Keep the breath steady and avoid straining with a prolonged breath hold.
Getting your next view ready…
The Air Bike primarily works the abdominals. It is a strength movement that needs no equipment.
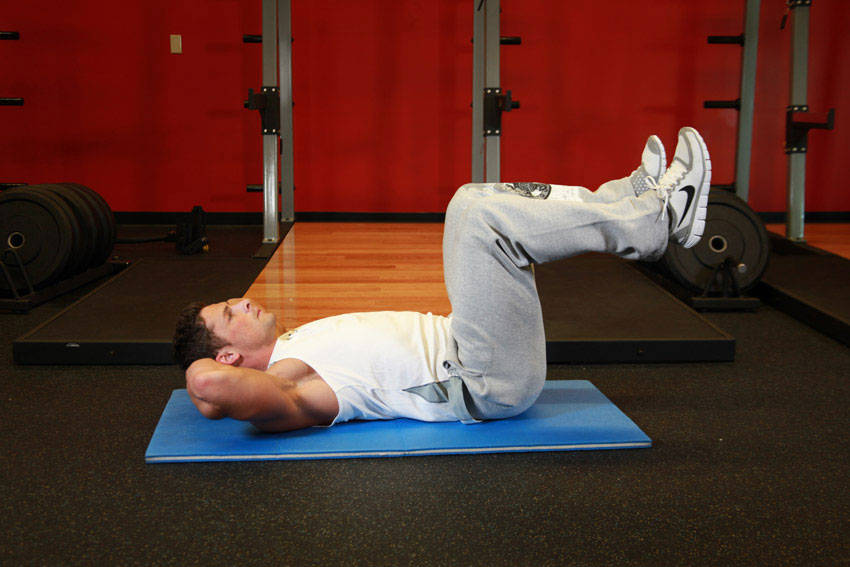
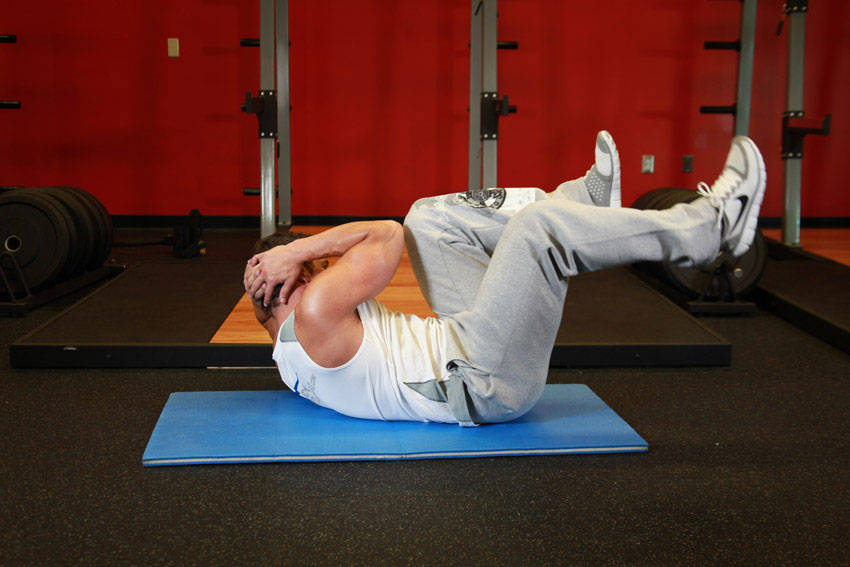 1 / 2
1 / 2How to
Movement instructions
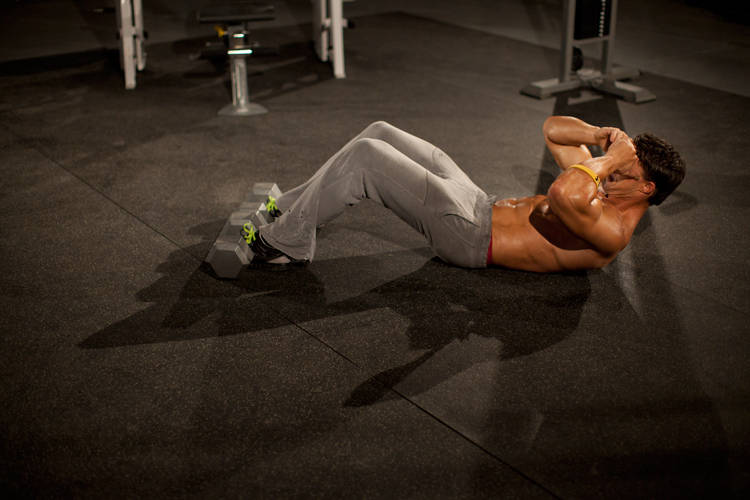
Lie flat on the floor with your lower back pressed to the ground. For this exercise, you will need to put your hands beside your head. Be careful however to not strain with the neck as you perform it. Now lift your shoulders into the crunch position.
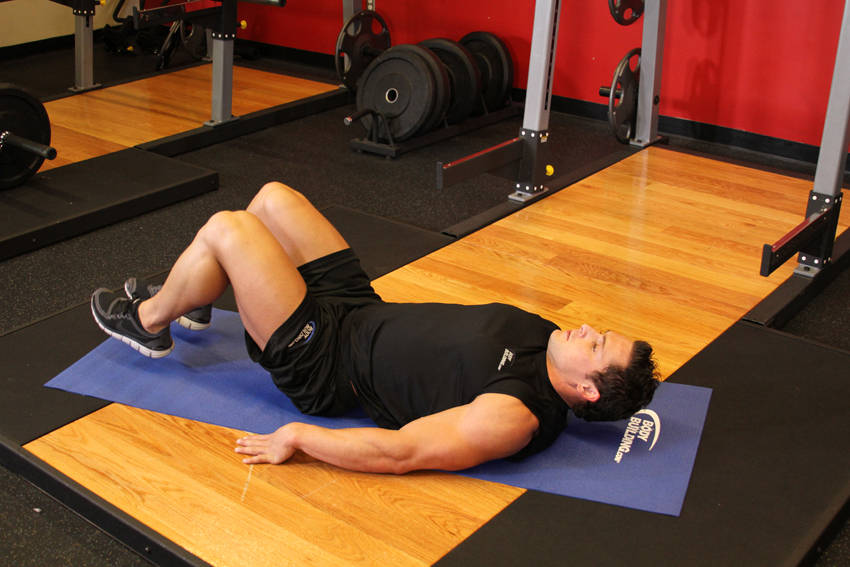
Bring knees up to where they are perpendicular to the floor, with your lower legs parallel to the floor. This will be your starting position.
Now simultaneously, slowly go through a cycle pedal motion kicking forward with the right leg and bringing in the knee of the left leg. Bring your right elbow close to your left knee by crunching to the side, as you breathe out.
Go back to the initial position as you breathe in.
Crunch to the opposite side as you cycle your legs and bring closer your left elbow to your right knee and exhale.
Continue alternating in this manner until all of the recommended repetitions for each side have been completed.
Technique guidance
Exhale as you pull through the working range and inhale during the controlled return. Keep the breath steady and avoid straining with a prolonged breath hold.
General guidance based on the exercise and equipment. It is not personal coaching or medical advice.
Your progress
Keep the same exercise variation, range of motion and recording method when comparing Air Bike sessions.
Repetitions and completed sets.
Example: 10, 9 and 8 completed reps. Keep each set separate instead of recording only the total.
Compare repetitions using the same variation and range. A different variation needs its own history; extra reps are not directly comparable if the movement changes.
Read the tracking guideThe examples show how to keep a record. They are not workout targets or a personalised training plan.
See how Jijibisha tracks your progressMuscles
Muscle guide
Abdominals is the primary muscle group. The lighter highlights show the supporting muscles involved in the movement.
In depth
The air bike is a bodyweight abdominal exercise performed while lying on your back and alternating your legs in a pedaling motion. As one knee moves toward your chest, you rotate your upper body toward it, then switch sides in a smooth and controlled rhythm.
You may also see this movement called the bicycle crunch, abdominal air bike, air bicycle exercise, or bicycle maneuver. Despite the name, it does not require an exercise bike or any other equipment. All you need is enough floor space to lie down comfortably.
The air bike primarily works the rectus abdominis and obliques while also involving the deeper abdominal muscles and hip flexors. It combines trunk flexion, rotation, and alternating leg movement, making it more coordinated than a standard crunch.
The exercise can be useful for beginners, home workouts, gym warm-ups, core circuits, and short bodyweight sessions. However, moving quickly is not the goal. The air bike becomes far more effective when every repetition is performed slowly enough to keep your lower back controlled and your abdominal muscles engaged.
The air bike is a dynamic core exercise that imitates the pedaling motion of riding a bicycle.
You begin on your back with your hips and knees bent. Your shoulder blades are lifted from the floor, and your hands are placed lightly beside or behind your head. You then extend one leg while drawing the opposite knee inward and rotating your torso toward that knee.
For example:
The alternating pattern continues for the desired number of repetitions or amount of time.
Although the elbow appears to move toward the opposite knee, the exercise should not be performed by simply swinging your elbow across your body. The rotation should come from your torso, with your ribs and shoulder moving toward the opposite hip.
This distinction matters. When you focus only on touching your elbow to your knee, it becomes easy to pull on your head, collapse your elbows inward, and rush through the movement without properly training your abdominal muscles.
| Category | Details |
|---|---|
| Also known as | Bicycle crunch, abdominal air bike, air bicycle exercise |
| Primary muscles | Rectus abdominis and obliques |
| Secondary muscles | Transverse abdominis, hip flexors and rectus femoris |
| Equipment | None |
| Difficulty | Beginner to intermediate |
| Exercise type | Bodyweight core exercise |
| Movement | Trunk flexion, rotation and alternating hip movement |
| Recommended range | 8 to 20 repetitions per side |
| Best used for | Core strength, abdominal endurance and home workouts |
| Main form priority | Slow rotation with lower-back control |
The term “air bike” can refer to two different exercises.
The air bike described on this page is a floor-based abdominal exercise. It is another name for the bicycle crunch and requires no equipment.
An air bike machine, sometimes called a fan bike or assault bike, is a stationary cardio machine with moving handles and a fan-powered resistance system. It is used for conditioning, interval training, and cardiovascular exercise.
The two exercises have very little in common beyond the name.
| Air bike abdominal exercise | Air bike cardio machine |
|---|---|
| Performed on the floor | Performed on a stationary bike |
| Requires no equipment | Requires a fan bike |
| Primarily trains the core | Trains the upper and lower body |
| Uses a controlled pedaling motion | Uses continuous cycling and pushing |
| Usually measured in repetitions | Usually measured in time, distance or calories |
When searching for instructions, “air bike abs exercise,” “abdominal air bike,” or “bicycle crunch” will usually return information about the floor exercise.
The air bike is often described as an abdominal exercise, but several muscles contribute to the movement.
The rectus abdominis is the long muscle running down the front of your abdomen. It is commonly associated with the visible six-pack appearance.
During the air bike, the rectus abdominis helps lift your head and shoulder blades from the floor. It also helps maintain the curled position of your upper torso as your legs alternate.
You should feel this muscle working throughout the set, not only when your elbow approaches your knee.
The external obliques run diagonally along the sides of your abdomen.
These muscles help rotate your torso toward the opposite side. When your right shoulder moves toward your left knee, the obliques contribute to that cross-body rotation.
The rotational element is one of the main differences between an air bike and a basic abdominal crunch.
The internal obliques lie underneath the external obliques and assist with trunk rotation and side bending.
The internal and external obliques work together to control the alternating movement. They also help prevent your torso from simply rocking from side to side.
The transverse abdominis is a deep abdominal muscle that wraps around the midsection.
It helps create abdominal tension and stabilize the trunk while your arms and legs move. It is especially important for controlling the position of your pelvis and lower back.
You may not feel this muscle as clearly as the rectus abdominis, but it contributes to maintaining a strong and controlled position.
The hip flexors help bring each knee toward your chest and control the extended leg.
They naturally participate in the air bike because both legs remain elevated and continuously move through hip flexion and extension.
If your abdominal muscles become fatigued or your lower back begins arching, the hip flexors may start dominating the movement. This is one reason that performing more repetitions is not always better.
The rectus femoris is one of the quadriceps muscles. Unlike the other main quadriceps muscles, it crosses both the hip and knee joints.
It assists with hip flexion and knee extension during the pedaling motion. You may feel the front of your thighs working, particularly when your legs are extended low toward the floor.
The muscles at the front of your neck help support the position of your head while your shoulder blades remain raised.
They should assist gently rather than becoming the main source of effort. Excessive neck fatigue usually indicates that you are pulling on your head, lifting your head too far forward, or continuing the set after your abdominal position has failed.
A regular crunch mainly involves trunk flexion. The air bike adds alternating rotation, which increases the involvement of the obliques.
This allows one exercise to challenge both the front and sides of your midsection.
The air bike can be performed at home, in a gym, while traveling, or anywhere you have a comfortable surface.
A mat can make the exercise more comfortable, but it is not required.
Your abdominal muscles must remain active while your legs and torso move repeatedly.
This makes the exercise useful for building the ability to maintain core tension over multiple repetitions. Abdominal endurance can support longer workouts and other activities that require sustained trunk control.
The air bike uses a cross-body movement pattern. One leg extends while the opposite side of your torso rotates toward the bent knee.
Beginners may initially find this rhythm awkward. With practice, the movement can improve coordination between the upper and lower body.
You can make the air bike easier by keeping your extended leg higher, reducing the amount of rotation, or returning both feet to the floor between repetitions.
You can make it harder by slowing the tempo, pausing in the rotated position, extending the legs farther, or maintaining continuous tension for a longer set.
The exercise works well with planks, side planks, dead bugs, reverse crunches, and other bodyweight movements.
Because it requires no equipment, you can move between exercises without setting up weights or machines.
The air bike combines several movements in one exercise. Your trunk flexes and rotates while your legs move alternately.
A few controlled sets can provide a substantial abdominal challenge without requiring a long workout.
Lie on a mat or comfortable floor with your legs extended or your knees bent.
Position your spine naturally and relax your shoulders before beginning.
Bring your fingertips lightly behind your ears or place your hands at the sides of your head.
Keep your elbows open rather than pointing them directly forward.
Do not interlock your fingers tightly behind your neck. Your hands should support the position of your head without pulling it toward your chest.
Lift both feet from the floor and bend your hips and knees to approximately 90 degrees.
Your thighs should point upward, and your lower legs should be roughly parallel to the floor. This tabletop position is your starting point.
Tighten your abdominal muscles and raise your head, shoulders, and upper back slightly from the floor.
Keep your chin a comfortable distance from your chest. Imagine holding a small piece of fruit between your chin and upper chest.
Your lower back should remain controlled against the floor without excessive arching.
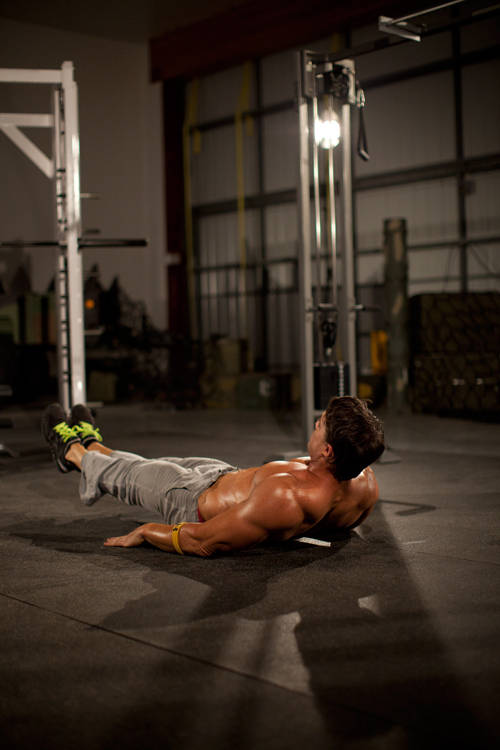
Slowly extend your right leg away from your body.
The leg can travel slightly upward rather than directly toward the floor. A higher leg position makes it easier to maintain control through the lower back.
Straighten the knee without kicking or snapping the leg.
At the same time, draw your left knee toward your chest.
The knee does not need to touch your chest. Move only as far as you can while keeping your pelvis controlled.
Rotate your upper body so that your right shoulder moves toward your left knee.
Think about bringing your right ribs or armpit toward your left hip. This cue often creates better torso rotation than trying to force the elbow toward the knee.
Exhale as you rotate and contract your abdominal muscles.
Return your torso toward the center while bringing both legs briefly through the bent starting position.
Avoid completely resting your shoulders or feet on the floor between sides unless you are using a beginner variation.
Extend your left leg, draw your right knee toward your chest, and rotate your left shoulder toward the right knee.
Continue alternating at a controlled pace.
After completing the final repetition, return both knees to the starting position.
Lower your shoulders and feet to the floor with control. Relax your neck and take a few normal breaths before sitting up.
Use this checklist to evaluate your technique:
A good repetition should feel deliberate. You should be able to pause briefly at any point without losing your position.
Try one or two of these cues while learning the movement:
Using too many cues at once can make the exercise confusing. Choose the cue that addresses your most common form problem.
Exhale as you rotate your torso toward the bent knee.
Inhale as you move back through the center, then exhale as you rotate toward the other side.
A practical breathing pattern looks like this:
Your breathing does not need to be exaggerated, but it should remain steady. Avoid holding your breath for the entire set.
Exhaling during the crunch can help you tighten your abdominal muscles and avoid building unnecessary tension in your neck and face.
One of the most common air bike mistakes is using the hands to pull the head forward.
This can create neck discomfort and reduce the amount of work performed by your abdominal muscles.
Keep your fingertips light. Imagine that your hands are only there to remind you where to position your head.
If you cannot maintain the crunch position without pulling, shorten the set or place your arms beside your body while learning the leg movement.
Bringing an elbow toward the opposite knee does not automatically mean your torso is rotating.
Some people keep their chest facing upward and repeatedly swing their elbows inward. This creates the appearance of a bicycle crunch without much meaningful trunk rotation.
Focus on moving your shoulder, ribs, or armpit toward the opposite hip.
Your elbow does not need to touch your knee.
The distance between them depends on your body proportions, mobility, and range of motion. Forcing contact can cause you to pull on your neck or collapse your upper body.
The goal is abdominal contraction and torso rotation, not physical contact between two body parts.
Fast pedaling often turns the exercise into a momentum-driven leg movement.
Slow down enough to feel your torso rotate and your abdominal muscles contract on every side.
Ten controlled repetitions can be more challenging than thirty rushed repetitions.
Your lower back may begin lifting from the floor when the extended leg moves too low or your abdominal muscles become fatigued.
Raise the extended leg higher and reduce the range of motion.
You can also bend the extended knee slightly until you develop enough control for a longer leg position.
Extending the leg close to the floor increases the lever length and makes the exercise harder.
A low leg is not automatically better. When it causes your pelvis to tilt forward or your lower back to arch, the exercise is no longer being performed within a controlled range.
Keep the foot higher until you can maintain a stable trunk.
The leg extension should be controlled.
Avoid aggressively kicking one foot forward and then rapidly pulling it back. The air bike should look like a deliberate pedaling action rather than sprinting.
Lowering your shoulders completely after every side reduces continuous abdominal tension.
During a standard set, keep the shoulder blades slightly raised while alternating.
Beginners can intentionally rest between sides as a regression, but this should be a conscious modification rather than an uncontrolled collapse.
Pulling the elbows forward encourages neck tension and reduces torso rotation.
Keep the elbows comfortably open. They do not need to remain perfectly level, but they should not squeeze tightly around your ears.
Holding your breath can make the exercise feel more stressful and may cause unnecessary tension.
Use a steady pattern of exhaling during the rotation and inhaling through the transition.
The set should end when you can no longer control your lower back, neck, or torso rotation.
Do not continue simply because a workout plan says to complete a certain number.
Clean repetitions are more useful than additional repetitions performed with poor technique.
Air bike repetitions can be counted in two ways.
Some programs count every rotation as one repetition. Others count a complete right-and-left cycle as one repetition.
Check how your program defines the movement. When logging the exercise yourself, choose one method and use it consistently.
A clear approach is to count repetitions per side. For example, 12 repetitions per side means 24 total rotations.
The appropriate number depends on your experience and how slowly you perform the exercise.
| Experience level | Sets | Repetitions | Rest |
|---|---|---|---|
| Beginner | 2 to 3 | 6 to 10 per side | 45 to 75 seconds |
| Intermediate | 3 to 4 | 10 to 15 per side | 45 to 60 seconds |
| Advanced | 3 to 5 | 15 to 20 per side | 45 to 75 seconds |
| Timed core circuit | 2 to 4 | 20 to 40 seconds | 20 to 60 seconds |
These numbers are starting points rather than strict requirements.
End the set when:
When you can easily complete the top of your repetition range with good technique, make the movement slower before adding a large number of additional repetitions.
A controlled tempo makes it easier to feel the abdominal muscles working.
Try this rhythm:
For a harder variation, take two seconds to rotate and two seconds to switch sides.
The movement should remain continuous, but it should never feel frantic.
The correct height is the lowest position you can control without your lower back lifting or your pelvis tipping forward.
For beginners, the extended leg may point diagonally upward.
As abdominal control improves, you may gradually lower the leg closer to the floor.
Use the following progression:
There is no benefit in lowering the leg beyond the point where your form deteriorates.
Lie on your back with your knees bent and feet on the floor.
Gently tighten your abdominal muscles while breathing normally. Practise maintaining this tension without lifting your shoulders.
Keep your feet on the floor and lift one knee at a time.
This introduces alternating hip movement while your torso remains supported.
Raise both legs into the tabletop position and hold for 10 to 30 seconds.
Keep your lower back controlled and breathe steadily.
From the tabletop position, lower one heel toward the floor and return it before switching sides.
This helps develop the trunk control needed for alternating leg extension.
Practise raising your shoulder blades without pulling on your neck.
Keep the movement small and focus on using your abdominal muscles.
You can also use the 3/4 Sit-Up or a basic crunch as a separate exercise while building strength.
Remain in a supported upper-body position and alternate extending one leg at a time.
Keep the legs high enough to prevent your lower back from arching.
Begin rotating one shoulder toward the opposite knee without trying to reach as far as possible.
Return through the center and switch sides.
Combine the controlled leg extension with a comfortable amount of torso rotation.
Progress the range slowly rather than trying to imitate a fast demonstration.
Keep one foot on the floor while the opposite knee moves inward.
Switch feet between repetitions. This reduces the continuous demand on your abdominal muscles and hip flexors.
Instead of fully straightening the extended leg, keep the knee partially bent.
A shorter lever makes the movement easier to control.
Extend each leg diagonally upward rather than close to the floor.
This helps reduce lower-back arching.
Keep both feet on the floor and rotate one shoulder toward the opposite knee.
This allows you to practise the upper-body portion before adding the pedaling motion.
Place your arms beside your body or lightly press your palms into the floor.
This can reduce neck strain while you learn the leg movement. It also removes the temptation to pull on your head.
Take three to four seconds to complete each side.
Moving slowly increases the time your abdominal muscles remain under tension and makes it difficult to rely on momentum.
Pause for one or two seconds while your shoulder is rotated toward the opposite knee.
Maintain the extended leg position during the pause.
Straighten the extended leg fully and keep it lower to the floor.
Use this variation only when you can prevent your lower back from arching.
Keep your shoulder blades raised and avoid passing through a fully relaxed position.
This increases abdominal endurance without changing the basic movement.
Extend your arms rather than supporting your head.
The longer upper-body position can increase the challenge, but it also requires greater neck control. Stop if your neck becomes uncomfortable.
Hold a small weight close to your chest while performing the movement.
Do not place a heavy weight behind your head. Added resistance should never force you to pull your neck or lose control of your lower back.
Master the standard bodyweight air bike before adding weight.
A basic crunch focuses on trunk flexion without the alternating leg movement.
It is easier to coordinate and may be a better starting point for someone who struggles to control the full air bike.
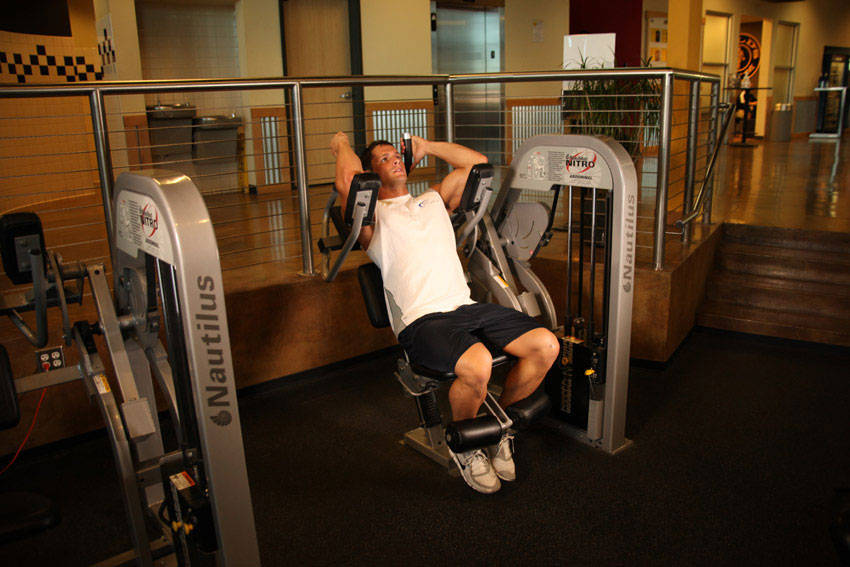
The Ab Crunch Machine provides another way to train trunk flexion with adjustable resistance.
The reverse crunch focuses on bringing the pelvis toward the rib cage.
It can be useful for people who want an abdominal exercise without repeatedly rotating the torso.
The dead bug uses alternating arm and leg movement while the torso remains relatively still.
It is a strong alternative when your main goal is learning to control the lower back during limb movement.
The side plank trains the muscles along the side of the trunk without dynamic rotation.
It complements the air bike by challenging the obliques through a different type of muscular action.
The cross-body mountain climber uses a similar opposite-knee movement from a plank position.
It generally creates a greater full-body and cardiovascular demand than the floor-based air bike.
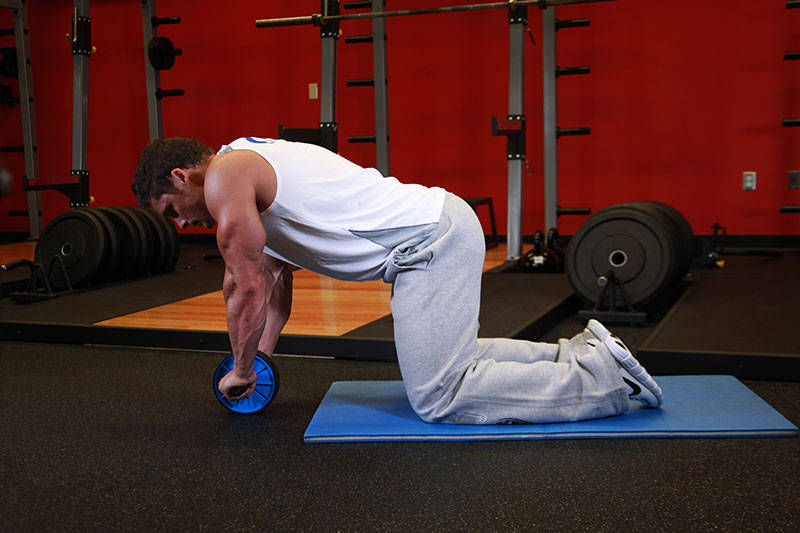
The ab roller emphasizes resisting excessive extension through the spine.
It is more advanced and places a greater demand on the shoulders and entire trunk. Build adequate core control before attempting a long rollout range.
See the Ab Roller exercise guide for technique and progression advice.
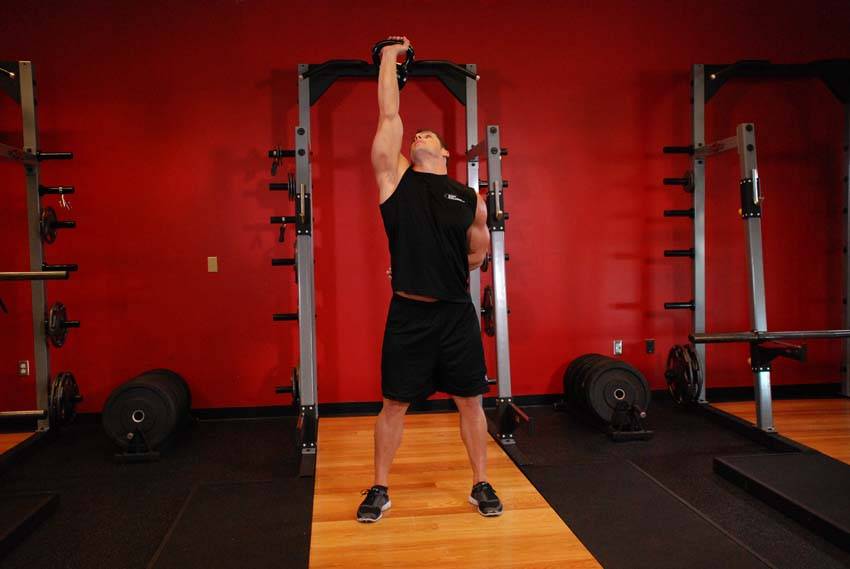
The kettlebell windmill trains the obliques, hips, and shoulder stability from a standing position.
It is considerably more advanced than the air bike and requires controlled mobility beneath an overhead weight.
See the Advanced Kettlebell Windmill guide before adding it to your routine.
The air bike and bicycle crunch are usually the same exercise.
Both involve:
Different exercise libraries may use slightly different starting positions or repetition instructions, but the basic movement is the same.
“Bicycle crunch” is the more widely recognized name, while “air bike” and “abdominal air bike” are common alternative names.
| Air bike | Regular crunch |
|---|---|
| Includes torso rotation | Primarily uses trunk flexion |
| Alternates the legs | Legs usually remain stationary |
| Trains coordination | Easier to learn |
| Strong oblique involvement | Greater focus on the front abdominal muscles |
| More demanding on hip flexors | Usually less leg involvement |
| Requires greater lower-back control | Easier to modify |
Neither exercise is automatically better for every person.
A regular crunch may be more suitable when you want to focus on controlled trunk flexion. The air bike may be more suitable when you want to add rotation and alternating limb movement.
A sit-up lifts more of the torso from the floor and generally involves greater hip-flexor contribution.
The air bike keeps the shoulder blades raised while the torso rotates and the legs alternate. It usually uses a smaller trunk-flexion range but requires more coordination.
People who feel discomfort during full sit-ups may prefer a controlled air bike, basic crunch, dead bug, or another core exercise. However, the air bike can also cause discomfort when performed with poor lower-back control.
Choose the exercise you can perform comfortably and consistently.
The air bike and mountain climber both use alternating knee movement, but they have different training effects.
The air bike is performed on your back and places more direct emphasis on trunk flexion and rotation.
The mountain climber is performed in a plank position and requires the shoulders to support body weight. It also tends to create a greater cardiovascular demand when performed quickly.
Use the air bike for focused abdominal work. Use mountain climbers when you want to combine core control with shoulder loading and conditioning.
The air bike does not require a long warm-up, but a few controlled movements can make it more comfortable.
Try the following sequence:
The warm-up should help you find abdominal tension and lower-back control. It should not fatigue your core before the working sets begin.
Air bikes work well as a core finisher after your main resistance exercises.
Performing them after squats, deadlifts, presses, and rows prevents early abdominal fatigue from interfering with your heavy lifts.
Use air bikes as one part of a balanced core workout.
A complete core session may include:
The air bike covers flexion and rotation, but it does not train every possible function of the core.
Pair air bikes with squats, push-ups, lunges, and other no-equipment exercises.
Keep the pace controlled even when the surrounding circuit is fast.
The air bike is particularly convenient for home training because it requires no equipment or setup.
A few sets can be added to a short workout without needing additional space.
Avoid exhausting your abdominal muscles before exercises that require strong bracing, especially heavy squats, deadlifts, overhead presses, and loaded carries.
A few easy repetitions may be suitable during a warm-up, but hard sets are usually better placed later.
Complete two or three rounds:
Rest for 45 to 75 seconds between rounds.
Complete three rounds:
Rest for approximately 60 seconds between rounds.
Perform the following after your main workout:
Maintain clean technique rather than trying to complete the greatest possible number of repetitions.
Use a two-second rotation and one-second pause during each air bike repetition.
Most people can perform air bikes two to four times per week as part of a balanced program.
The ideal frequency depends on:
You do not need to perform hard air bike sets every day.
Your abdominal muscles need recovery like other muscles. Daily practice may be appropriate when the sets are easy and focused on technique, but frequent high-effort sessions are not necessary for progress.
Progress should involve more than simply performing endless repetitions.
Use this order:
Change one variable at a time. Adding more repetitions, lowering the legs, and increasing speed simultaneously makes it difficult to know whether your technique is actually improving.
Track your sets, repetitions, tempo, and variation so that progress is based on more than memory. You can use Jijibisha routines to organize the exercise within your weekly program.
The air bike can be suitable for beginners, but the complete movement may initially be difficult to coordinate.
A beginner should first learn how to:
Use a bent-knee, high-leg, or feet-down variation when the full movement causes your lower back to arch.
There is no need to perform the most difficult version immediately.
Consider using another exercise or seeking professional guidance if you experience:
Stop the exercise when discomfort feels sharp, sudden, or different from normal muscular effort.
People with existing medical conditions, osteoporosis, back problems, or recent surgery should obtain individualized guidance before beginning a new core routine.
Air bikes train the abdominal muscles, but they cannot selectively remove fat from the stomach.
Fat loss occurs through a sustained difference between the energy your body uses and the energy you consume. Nutrition, total physical activity, resistance training, sleep, and consistency all contribute.
Air bikes can help strengthen and develop the muscles underneath abdominal fat. Whether those muscles become visible depends largely on overall body composition.
Do not judge the value of the exercise only by whether it immediately changes your waistline. Core strength and muscular endurance are worthwhile training goals on their own.
Air bikes can contribute to abdominal muscle development, particularly when performed with progressive difficulty and consistent technique.
However, visible abdominal definition is affected by several factors:
No single abdominal exercise guarantees visible abs.
Use air bikes as one component of a complete resistance-training and nutrition plan.
The floor-based air bike is primarily a strength and muscular-endurance exercise rather than a major calorie-burning activity.
A short set uses energy, but it will not usually match the calorie demand of running, cycling, swimming, or a full-body conditioning workout.
The fan-powered air bike machine can create a much greater cardiovascular and energy demand, but that is a different exercise.
Perform the abdominal air bike because it suits your core-training goals, not because a watch or app assigns it a large calorie number.
The floor-based air bike is commonly called the bicycle crunch, bicycle maneuver, abdominal air bike, or air bicycle exercise.
The main muscles worked are the rectus abdominis and internal and external obliques. The transverse abdominis helps stabilize the trunk, while the hip flexors and rectus femoris contribute to the leg movement.
The bodyweight air bike can raise your breathing rate during long or fast sets, but it is primarily a core exercise.
It should not be confused with the fan-powered air bike machine used for cardiovascular training.
No. Your elbow does not need to touch your knee.
Focus on rotating your shoulder and rib cage toward the opposite hip. Forcing contact can encourage neck pulling and poor technique.
Neck discomfort may occur when you pull on your head, push your chin toward your chest, or continue holding your head up after your abdominal muscles are fatigued.
Keep your hands light, leave space beneath your chin, shorten the set, or use a variation with your shoulders resting on the floor.
Stop if the discomfort is sharp or persistent.
Your lower back may arch when the extended leg travels too close to the floor or when you lose abdominal tension.
Raise the leg, bend the knee, reduce the range, or return to alternating heel taps.
Stop the exercise if pain continues.
The hip flexors naturally help move the legs.
They may become especially noticeable when your legs remain low, your set is long, or your abdominal muscles are no longer controlling the pelvis.
Use a shorter set and keep the legs higher.
Slow and controlled repetitions are generally better for learning technique and maintaining abdominal tension.
Moving quickly may be useful in some conditioning circuits, but speed should not cause your lower back to arch or your torso rotation to disappear.
Start with two or three sets of 6 to 10 repetitions per side.
Use a manageable variation and stop before your neck or lower back loses position.
Easy technique practice may be performed frequently, but hard abdominal training does not need to be done every day.
Two to four weekly sessions are enough for many people.
Air bikes involve more coordination and torso rotation. Basic crunches are easier to learn and allow greater focus on trunk flexion.
The better exercise is the one that matches your goal and can be performed without discomfort or loss of control.
Yes. Alternating torso rotation makes the obliques major contributors to the movement.
Rotate through the ribs and shoulders rather than simply swinging the elbows.
During a standard air bike set, keep your shoulder blades slightly raised to maintain abdominal tension.
Beginners may lower the shoulders between repetitions as an easier variation.
Lower your leg only as far as you can without arching your lower back.
A higher leg position is appropriate when you are still developing core control.
Slow the movement and compare your range on each side.
Use the range you can control on the weaker side rather than forcing it to match the stronger side immediately. Persistent pain or a major movement difference may require professional assessment.
No single exercise trains every function of the core.
Combine air bikes with exercises that challenge your trunk to resist extension, sideways bending, and rotation. Planks, side planks, dead bugs, carries, and controlled compound lifts can all contribute to a more complete program.
The air bike is a simple but demanding bodyweight exercise for the abdominals and obliques. It requires no equipment, fits easily into home and gym workouts, and can be adjusted for different levels of core strength.
The most important part of the exercise is not how quickly you pedal or whether your elbow touches your knee. What matters is maintaining abdominal tension while your torso rotates and your legs alternate.
Keep your hands light, move your shoulder toward the opposite hip, control your lower back, and extend each leg only as far as your current strength allows.
Begin with a manageable variation and a moderate number of repetitions. As your form improves, progress by slowing the movement, pausing during each rotation, or increasing your controlled range.
A well-performed set of air bikes should feel challenging through the abdomen, not painful through the neck or lower back.
Swap it
Different equipment, same muscle
These movements also target the abdominals using something else.
Related
Related movements
Get the app
Add it to a routine, record every completed set, and keep the workout saved on your phone even when the gym has no reception.